Docs / Panel reference / Text to Motion
Text to Motion
Card 03 — the core generation card: parameters, output target, and Generate.
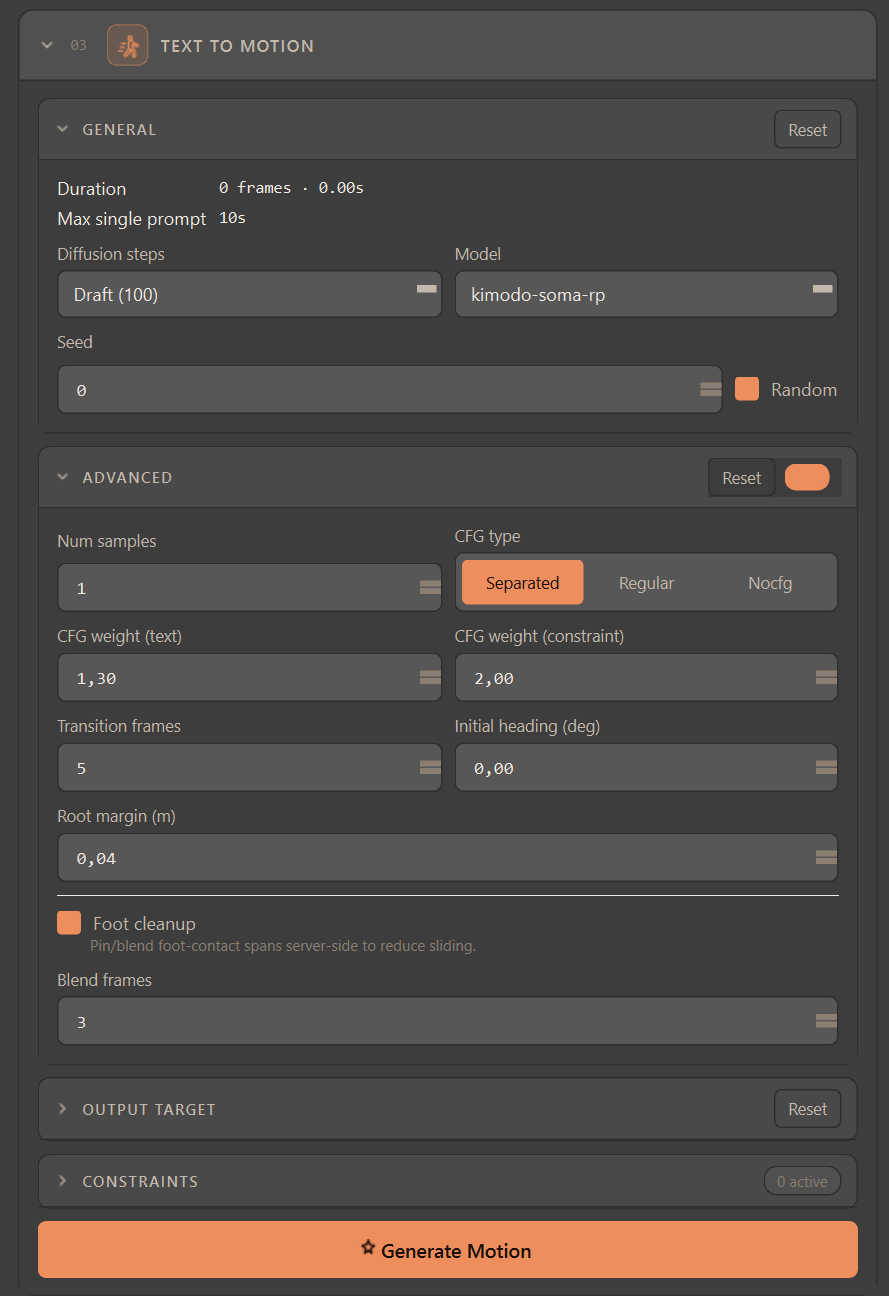
The core generation card. The prompt text itself is authored on the Prompt Timeline (card 06); this card holds the generation parameters, the output target, and the Generate Motion button. The header shows the current Duration (frames · seconds) and reminds you that a single prompt maxes out at 10 s.
#General
| Control | Description |
|---|---|
| Diffusion steps | Quality preset: Draft (100), Standard (300), Fine (500), or Custom…. More steps = higher quality, slower. Custom reveals a 1–1000 field; the server caps steps at 500 and may reject higher values. Standard (300) is the default. |
| Model | The generation model (default kimodo-soma-rp-v1.1). Populated live from the server's capabilities. The choice also decides the skeleton: which rig Create Skeleton builds, and which canonical skeleton your scene rig is compared against — so switching model can turn a matching rig into one that needs retargeting. |
| Seed + Random | Fixed seed for reproducible results, or check Random (on by default) for a new one each run. |
#Advanced (toggle to enable)
Mirrors the fuller parameter set. The toggle in the header shows/hides the body; its Reset restores the parameters without collapsing the panel.
| Control | Description |
|---|---|
| Num samples | How many variations to generate at once (1–8, default 1). Multiple samples fan out into distinct takes (Story / New Take only). |
| CFG type | Guidance mode: separated (default), regular, or nocfg. |
| CFG weight (text) / (constraint) | How strongly the text prompt vs. the spatial constraints steer the result (0–10, each default 2.0). |
| Transition frames | Blend length between sequenced prompt blocks (0–30, default 5). |
| Initial heading (deg) | Facing direction the character starts from (0–360, default 0). |
| Server post-processing | On by default. Runs the server's own post-processing pass (root-drift correction) on the sampled motion. This is the only cleanup lever that reaches the model — it replaces the former Foot cleanup / Blend frames pair, which ran on the client and had no effect on the applied result. |
| Root margin (m) | Horizontal slack (0–0.2 m) the server's post-processing would use when deciding whether to correct root drift. Grouped under Server post-processing and greyed out when it is off. Collected and remembered, but not yet sent to the server. |
#Output Target — the generation mode
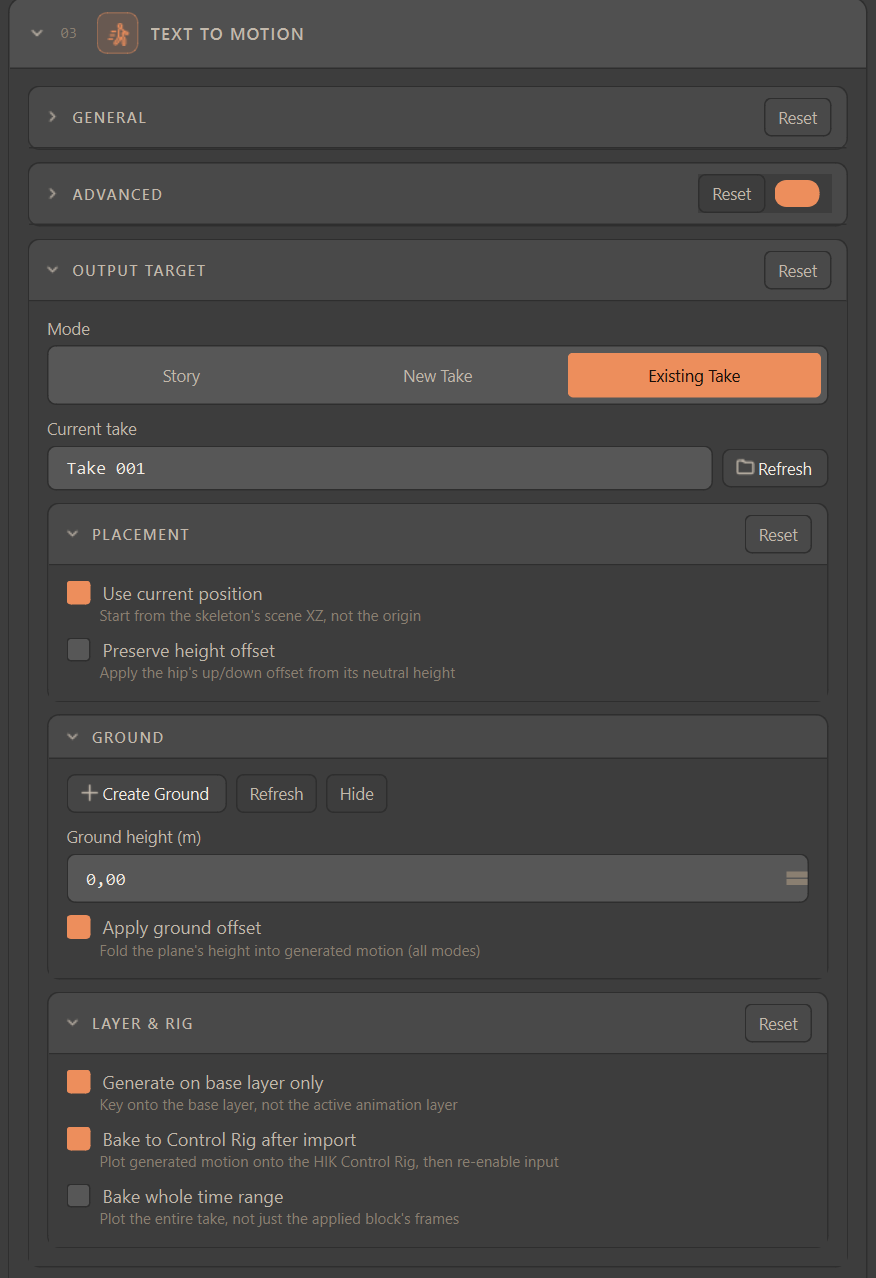
The Mode segment is the single most important choice on this card: it decides where the generated animation is written and how it coexists with the rest of your scene. All three modes generate from the same prompts and parameters — they differ only in the destination and its side effects. Pick the mode first, then the mode-specific options appear directly beneath it.
#New Take
Creates a brand-new MotionBuilder take and writes the generated motion into it, leaving all your existing takes untouched. This is the safest default while you iterate: every generate produces a clean, self-contained clip you can compare or throw away.
- Auto-name from first prompt (on by default) — the take is named from the
first N characters of the earliest timeline prompt (N is set by Auto
take-name length in Settings), so takes are self-describing. Regenerating the
same prompt adds a
_v001/_v002… version suffix instead of overwriting, giving you an automatic version history. - Turn auto-naming off to type an exact Take name of your own.
- Num samples > 1 fans out into that many separate takes in one run, so you can audition several variations of the same prompt side by side.
#Existing Take
Applies the generated motion into the take that is currently active in MotionBuilder, shown as a read-only Current take display (Refresh re-reads the active take). Use this to iterate on a specific take, to overwrite a previous attempt in place, or to layer generated motion onto animation you're already working in — rather than accumulating new takes.
- Because everything merges into one existing take, Num samples is forced to 1 here (multiple samples have nowhere distinct to land) — the field is greyed out.
- Combine with Generate on base layer only (Layer & Rig) to control whether keys land on the base layer or the active animation layer of that take.
#Story
Writes each prompt block as its own FBX clip on a MotionBuilder Story track (one track per block, exported to your Story Export Path from Settings). This is the non-linear, editorial mode: instead of one baked take, you get discrete clips you can re-order, trim, blend, and re-time on the Story timeline — ideal for sequencing a performance out of several actions and revising individual beats without regenerating the whole thing.
- Regenerating a block writes a new version of that clip and keeps the track in place, so the Story edit you built survives across regenerations.
- Passthrough — gaps between clips reveal the underlying take's animation instead of freezing, so the character keeps moving between generated beats.
- Replace current Clip — overwrite the newest version of a clip in place rather than adding another version, keeping the folder tidy while you dial one beat in.
- Baking to the Control Rig is a no-op in Story mode (the motion lives in a passthrough clip, not on skeleton keys), so that option is greyed out here.
Which mode when — Reach for New Take while exploring (clean, versioned, disposable), Existing Take to refine or overwrite one specific take, and Story to assemble and non-linearly edit a multi-action performance from separate clips.
#Placement
Re-seats the generated (origin-canonicalized) motion to the character's scene position at the prompt's start frame.
- Use current position (on by default) — start from the skeleton's scene XZ and facing instead of the origin. It owns horizontal placement and yaw only, never height.
- Preserve height (off by default) — starts the motion at the height the rig is actually standing at rather than the model's own standing height. It is sent to the server as a start anchor on the hips (a height, not a local offset), so nothing is added to the result afterwards — what you see in the viewport is what the pin means. Independent of Use current position: either can be on without the other. A Full Body constraint covering the start frame takes precedence, since it already carries a height of its own.
Scope of Preserve height — It applies to the main Generate Motion run. It is not sent by Generate Selected Prompt or by the per-gap fan-out (when your prompt blocks have gaps between them, each contiguous group is generated as its own run) — the Console says so when you generate with the option on. On a single-block regeneration, leaving Keep start pose checked achieves the same thing, because the pinned boundary pose already carries the hip height.
#Ground
A movable ground-plane object whose world-Y is folded into the vertical offset, so motion stands at ground + hip height.
- Create Ground — spawn or find the plane.
- Ground height (m) — the plane is the source of truth (the field spans −1000 … 1000 m and stays disabled until a plane exists); Refresh pulls its live Y into the field, and editing the field moves the plane.
- Hide / Show — toggle plane visibility.
- Apply ground offset (on by default) — fold the plane's height into the generated motion so the character stands on the plane. Applies in all modes. The related Correct ground offset switch lives in Settings → Extra options.
#Layer & Rig
| Control | Description |
|---|---|
| Generate on base layer only | On by default. Forces generated keys onto the take's base layer regardless of the active animation layer. |
| Bake to Control Rig after import | Off by default. After apply, plots the generated motion onto the HIK Control Rig and re-enables the HIK source — leaving a characterized, hand-editable result. No-op without an HIK character or in Story mode. |
| Bake whole time range | On by default. Plots the entire take rather than only the applied block's frames. Active only when baking is on. |
Generate Motion builds MMCP segments from the active character's timeline blocks and sends the request. A live progress bar and status label show the run; the card is locked while generating. Shortcut:
Ctrl+Gover the timeline.