Docs / Getting started / The tool window
The tool window
A map of the numbered workflow cards, and what the Animatica Timeline is for.
The window docks natively into the 3ds Max main window, and Max restores its dock position across sessions. Text fields inside it are flagged so Max's single-key hotkeys do not swallow your typing — you can type a prompt containing any letter without the viewport reacting.

#The cards
Everything is one scrolling column of collapsible, numbered cards. The numbers are the workflow order, not a hierarchy.
| Card | Purpose | Where it is |
|---|---|---|
| 00 · Model | Which model generates, and the knobs only that model has | In the column |
| 01 · Skeleton | Create, adopt, pick or delete the rig | In the column |
| 02 · Motion Import | Load motion from a file on disk | Its own window — Animatica ▸ Open Motion Import… |
| 03 · Text to Motion | Generation parameters, output placement, constraints, and the Generate button | In the column |
| 04 · Single Pose | One pose at the current frame | In the column |
| 05 · Console | The log every other window writes to | Its own window — Animatica ▸ Console… |
Settings is not a card here. It opens as a separate window from the Animatica menu, and shares this window's state. Two more windows open the same way: the Console and Motion Import. Every one of them reads and writes the same state as the column, so a rig loaded in Motion Import is the rig the Skeleton card shows.
#Compact and Full
The column has two layouts, switched with the Compact / Full control in the header row. Compact is how a fresh install opens: each card keeps its workflow controls and folds away the knobs, so what is left on screen is pick a rig, write a prompt, Generate. Full shows everything.
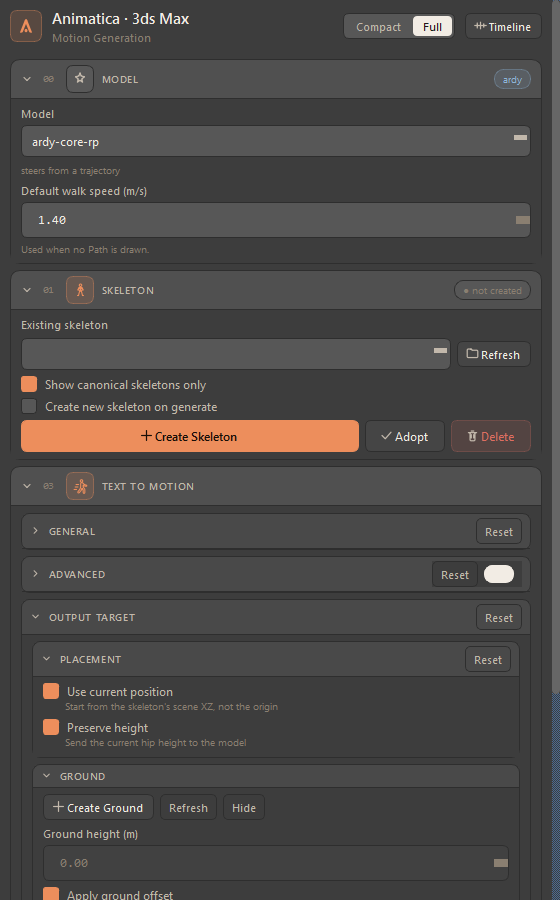
What Compact folds, card by card:
| Card | Hidden in Compact |
|---|---|
| Model | Nothing — it is the first thing the workflow asks for |
| Skeleton | The canonical filter, Create new skeleton on generate, and Adopt |
| Text to Motion | The whole Advanced group, and the Ground and Layer & Rig blocks of Output Target. Placement stays, because where the motion lands is a workflow question |
| Constraints | Convert Animkeys, the keyframe row, the two path display switches and the Prev / Next buttons |
| Single Pose | Use current position, Auto apply as constraint and Key pose |
Three things make the switch safe to flip:
- Nothing is reset. A hidden control keeps whatever you set through it, and keeps working. Compact is show/hide only.
- Hidden is not silent. In Compact, a line under Generate Motion names any folded-away setting that still differs from its default — "2 hidden options differ from defaults: Num samples = 4, Match scene FPS = off — switch to Full to review" — so a stale knob cannot tint a generation unnoticed. The line is absent when everything is at its default.
- Two windows, two switches. The Settings window has a Compact / Full switch of its own, on its own remembered flag, so folding the column leaves Settings as it was. The Animatica Timeline is never compacted.
Both choices are remembered per host. Unlike the other hosts, there is no menu item for the toggle — the two switches are the only way, on purpose.

Many groups carry their own Reset, scoped to the fields that group owns — resetting Advanced restores its parameters but deliberately leaves the group's enable toggle alone, so a reset does not collapse the panel you are editing.
#The Animatica Timeline
The timeline has no home inside the panel. It lives in a floating window that opens by itself the first time the tool window is shown, and is re-opened from the Timeline button in the top right of the window header. Closing it hides it — your prompts are not lost.
It is where the work is authored in time:
- Prompt blocks. Press Add Prompt, or double-click empty space to create a block and edit it straight away. Drag a block to move it, drag its edge to resize. One generation builds a single request out of every block on the ruler.
- Constraint pins. Six quick-add buttons in the header capture a constraint of their type at the playhead; pins then sit on the ruler and their markers in the viewport, in matching colours.
- The header also carries the skeleton selector with Add — the same picker as in card 01 · Skeleton, kept in lock-step with it — plus Convert Animkeys, an inline pose prompt with Pose, Generate, Save Prompts / Load Prompts, the zoom controls and the mode readout, which reads Replace.
- One ruler per rig. Prompts and pins belong to the rig picked in the skeleton selector. Switch rigs and the ruler switches with them; delete a rig and its prompts and pins go with it.
The scene range is yours — the timeline follows the scene's range and frame rate live, and Animatica never writes the scene range back.
Prompts travel inside the .max file: they are stored on the scene root in
a binary-safe slot that survives save and load. Save Prompts and Load
Prompts additionally write them to, and read them from, a file of their own,
which is useful for moving a set of prompts between scenes.
#When a button seems to do nothing
Open the Console. Most failures are logged there as a line rather than raised at you, and nothing is lost by opening it late — the main window logs whether or not the Console has ever been opened, and the buffer is replayed when it opens.